Shot Manager
| Version: | 0.7.6 |
|---|
Contents
Getting Started
Shot Manager is an add-on for Blender 2.90 and above. Created as a tool by myself Pablo Tochez A. [contact@pablotochez.com] in order to assist in the organization of complex files containing multiple shots, view layers and cameras. I am an artist with some coding knowledge for making time saving tools and digital artworks. Shot Manager should be installed like any .zip add-on [Blender 2.8 Install Add-ons 00:38-https://youtu.be/14G_YIVdBd0?t=38]. Make sure you remove any previously installed versions first and restart Blender. You will not lose shot data un-installing the addon/ This documentation is intended for the paid version available on Blender Market.
Version 0.7 and above do not support versions of Blender below 2.90. Material overrides are now legacy and will only work if legacy mode is enabled.
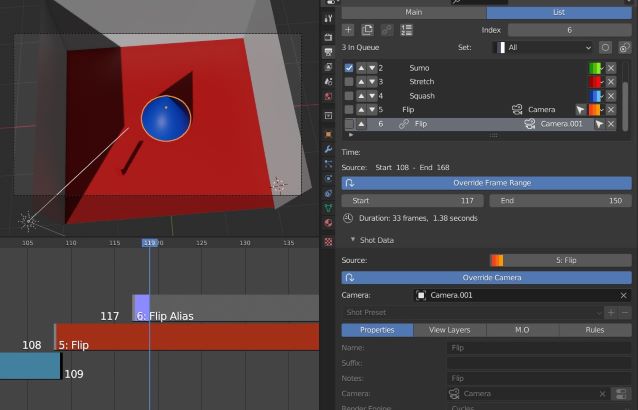
Main Panel
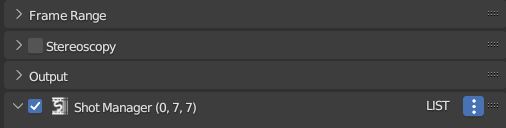
The main interface is found in the Properties panel under the Output tab.
- Enable , The first tick box will toggle the affect of Shot Manager on your scene. Un-tick if you need to turn off its influence, particularly if rendering alternative frame ranges or View Layers.
- Main/List , Select the shot type. Main is for general editing and not bound to shot data however some shot properties are inherited from the Main if not set. To activate a shot simply select it in the list. Shot names are appended onto this path in subfolders.
Main vs List
The ‘Main’ shot is intended for general editing and previewing and is not considered for batch rendering or exporting. Settings can be copied to and from the Main shot and Shot List. Some ‘List’ shot defaults are inherited from the Main shot.
Creating a Shot
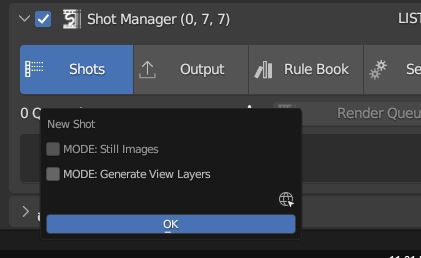
When making your first shot, you’ll be asked for optional modes. These are preset settings for various workflows.
Still Mode
Found in the Settings tab and the first shot creation popup box.
Still Mode is useful when rendering single frames such as product visualisation. Still Mode is used by the batch rendering queue like regular shot and can be rendered using any module. It uses an alternative frame to the normal start and end parameters and will output from all available output nodes.
Generated View Layers Mode
Found in first shot creation popup and Settings tab.
This mode enables the following settings:
- Switch to Primary Layer,
- Generate Primary Layers
- View Layer Default to ‘Primary Layer’.
The work flow is designed for users who wish to create unique View Layers for each shot where different collections are visible per Shot. This work flow is most commonly used in product rendering and visualization. When making a new Shot, a View Layer will be generated with the Shot’s naming. The newly created View Layer will be set as the Shot’s Primary Layer. The Primary Layer in combination with the other settings mentioned will become the active View Layer and will be renderable when the Shot is selected. It is therefore not necessary to alter the View Layer save/render states for the Shot.
Shot Operations
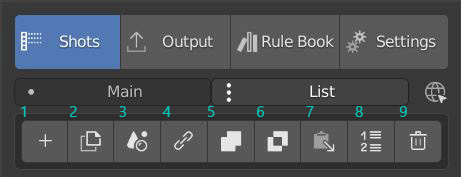
- Add new , Adds a new shot to your list.
- Duplicate , Duplicate active shot.
- Apply Settings Use the current scene settings to pre-fill shot data
- Alias , Make a new alias shot.
- Join , Combine two shots including frame ranges and options for view layer, rules and whether or not to delete the target.
- Split , Divide a shot, creating a duplicate at the given frame.
- Copy From Shot , Copy data from another shot. Select source shot name followed by specific data or ‘All’. Apply to all queued shots will copy the source data to all queued /enabled shots.
- Move Shot to index , Move the active shot to another index for fast reordering.
- Delete , Delete the selected shot.

- Queue Count , Displays the number of shots in the local list enabled for render queue.s
- Index , An alternative way of defining the active shot.
- Set , Filter visible Shots by colour set.
- Queue All/None Toggle , add all shots to the output/render queue.
- Invert Queue Toggle , Invert the enabled shots
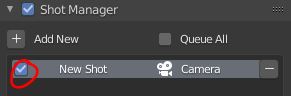
List Area
- Enable/Queue Shot , The Tick Box on the Left of your shot name will add it to the output/render queue.
- Arrows Up and Down will sort your shots, but ultimately have no affect on your project.
- Camera Select , Select the camera if it has been defined in its properties.
- Colour Set , Assign a colour tag to the shot for filtering.
Drop Down Area
- Search , Filter visible Shots by name or partial text.
- Reverse , Reverse the displayed order of Shots.
- Show Suffix , Add the Shot’s suffix to it’s displayed name.
- Show Camera , Show the name of associated cameras.
- Alias Shots , Show/Hide alias Shots.
Filtering and Colour Sets
Shots can be filtered from the list by keyword or by colour set. Filtering does not affect the render queue and is only for visibility,sequence playback and scrubbing.
Colour sets can be assigned to each shot within the list panel and filtered in the dropdown below the list (properties panel) or above in the quick panel. They will also determine the strip colour in the Shot Overlay.
Alias Shots
Alias shots reference an existing shot for all properties unless they use overridden start and end frames (single frame in Still Mode) or camera. These can be used for multi-cam set-ups where multiple cameras are used to render a scene but retain the same base filename and filepath.
NOTE: If not overriding frame range to unique frames, these images will save over each other when batch rendering unless path constructor nodes are used, in which case using the camera name input can give a unique path or filename.
Alias shots can also be used to re-render sections of shots without losing their original frame range.
Shot data
Time
Each shot contains its own data set that may include any of the following:
- Start Frame
- End Frame
- Single Frame, Still Mode.
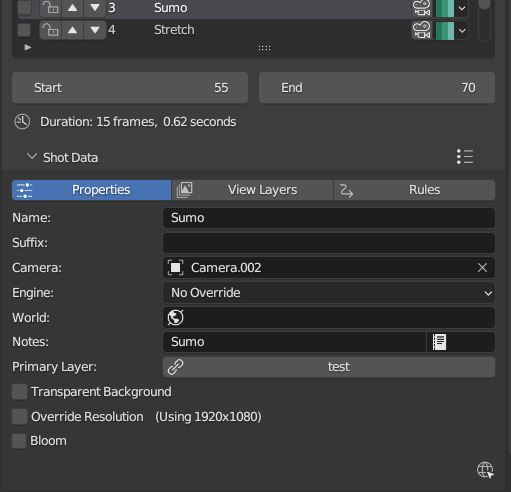
Properties
- Shot Name, A unique name for your shot, this will also be an output sub-directory and filename for the shot.(Best practice is to avoid spaces)
- Use Suffix Add a suffix to the shot’s filepath.
- Camera object, automatically set as the render camera when shot is selected. Arrow button, select as active object.
- Render Engine, set render engine for specifically for the shot, now supports addon engines.
- Render Samples, If using Render Engine override. Override samples, 0 = no override.
- World , World data, inherits from Main if empty.
- Notes, for shot descriptions.
- Primary Layer, select a View Layer that will become activated when selecting the shot if ‘Switch to Primary’ is enabled in settings. Also used as a default render layer if ‘Unpinned default’ is set to ‘Primary Only’ (View layer tab).
- Transparent Background, set film transparency for the shot.
- Override Resolution , shot specific output resolution.
- Bloom, Eevee only.
View Layers
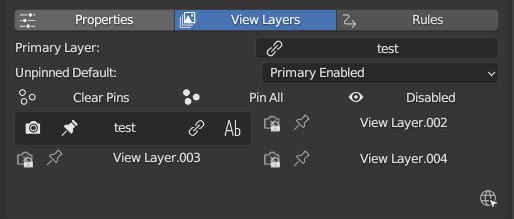
- Primary Layer, select a View Layer that will become activated when selecting the shot if ‘Switch to Primary’ is enabled in settings.
View layers pinned states include ;unpinned/not renderable ,unpinned/renderable,pinned/renderable, pinned/unrenderable.
- Unpinned default, See Settings > View Layer Default.
- Un/Pin All Save or unpin all view layer states.
- Enabled and Primary Only Only displays the renderable view layers for the active shot.
- ‘AB’ icon means: Rename the Primary Layer to match the shot’s name.
- Link icon indicates the view layer is the shot’s primary layer and can be clicked to reassign the layer.
- ‘Broken Link’ icon means: the shot has an identical name to this View Layer, set as Primary.
Overlay
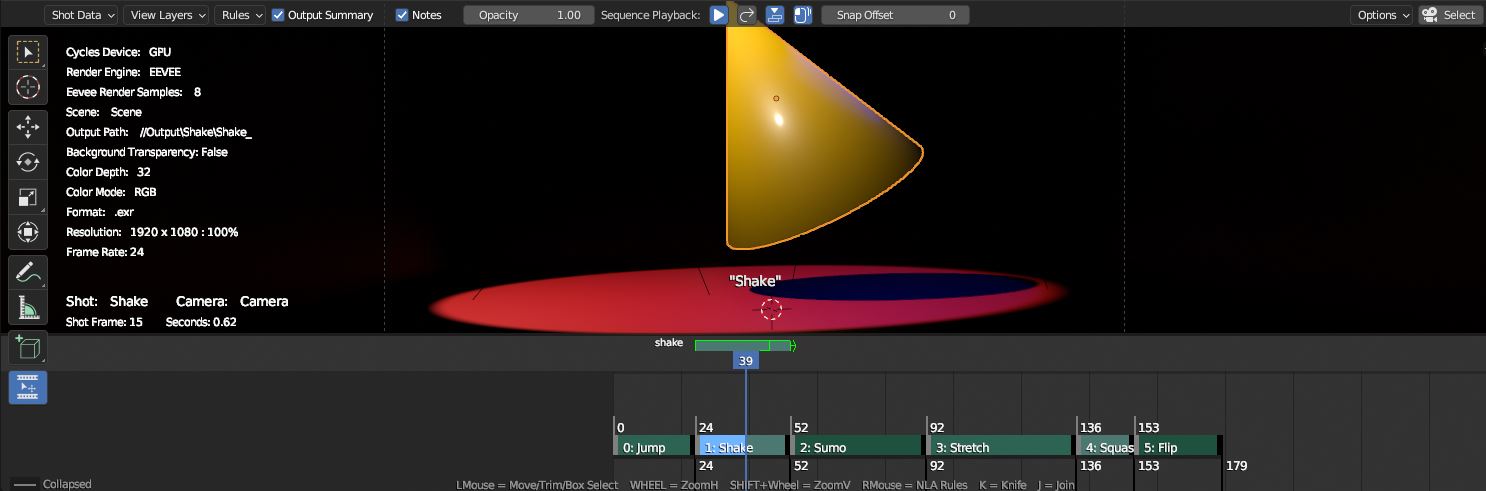
Visibilty
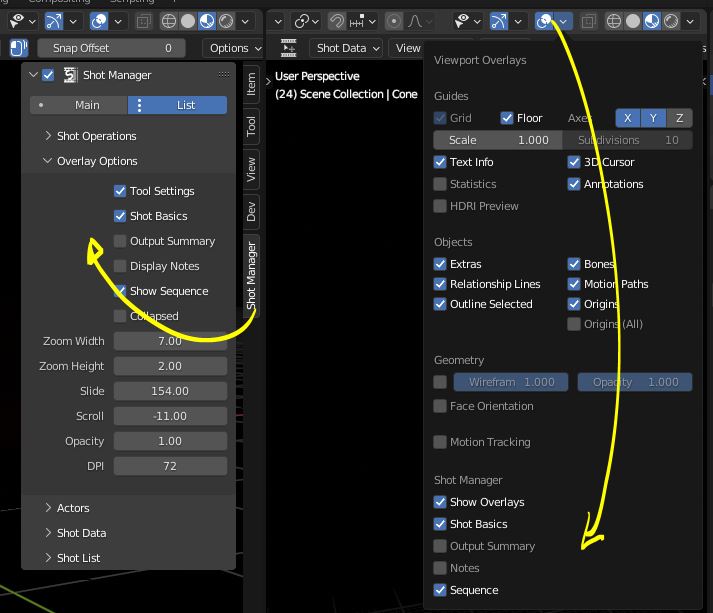
Visibiltity settings are found in the 3D View header, header tool settings and side panel (‘N’ Panel).
- Collapsed , Toggle between a stacked layout or colapse linear layout for the Shot Editor.
- Zoom Width , Scale Shot strip width.
- Zoom Height , Scale Shot strip height.
- Slide , Scale Shot Editor height.
- Scroll , Scrol Shot Editor.
- Opacity , Shot editor opacity, may be overriden by camera passerpartout settings when in camera view.
- DPI , text and ui size. Added to Blender’s UI Resolution Scale in Preferences. This setting is stored in the addon preferences and will be persistant.
Shot Editor

Many shot operation are available when using the Overlay in combination with the Shot Edit Tool.
- Left Mouse Click , on a shot strip or NLA strip (NLA Rules) to offset its timing, end handles to trim. Hold SHIFT to enable snapping to nearest shot.
- Right Mouse Click , on a strip or or NLA strip (NLA Rules) to popup context menu.
- Box Selection ,Click + hold outside a strip or press ‘B’ to start a box selection. Drag the selection box over shot handles to select them for moving and trimming.
- Mouse Wheel , scroll wheel to scale editor horizontally. Hold SHIFT to scale vertically.
- Press K , knife tool. Slice Shots at mouse click, hold click a drag to place slice.
- Press J , Join tool. Click and drag to merge a shot with it neighbour. A popup box with options will appear.
- Delete Target , Delete the target shot. Disable to keep the shot.
- Assimilate Layers , Add the target shot’s View Layer states to the resulting combined shot.
- Assimilate Rules , Add the target shot’s Rules to the combined shot. NLA rules may not be supported if there is an already existing rule.
Right Click Menus
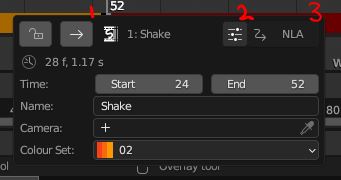
- 1 Jump to Shot , Available if not the active shot.
- 2 Shot Properties , Edit basic shot properties.
- 3 NLA Properties , Edit and add NLA tracks (Shot Rules).
- 3 NLA Track Properties , Edit NLA overrides and strip settings (Shot Rules).
Text Overlays
- Shot Basics , Displays the active Shot name and render camera as well as the relative Shot frame and seconds. SM batch render progress will also be displayed here.
- Output Summary , Displays render information.
- Notes , Shot notes will appear in the bottom centre of the 3D window. Shot notes can be found in the Shot’s properties.
Rule Book
Shot rules are a powerful way to override data blocks in Blender. Rules are defined in the Rule Book panel. Once created in the Rule Book, they can be assigned to shots. There are many different types of rules which target various data types.
Most rules follow the principle of; override data A with data B, if a collection is defined, the affect will be restricted to that collection. Rules defined in the Rule Book can then be re-used by assigning them to the shots individually. If the following shot doesn’t have a rule, the data block will be reset to its original or default state. Caution: large scenes with many objects may take longer to switch between shots.
Material,Light, Camera & Mesh Rules
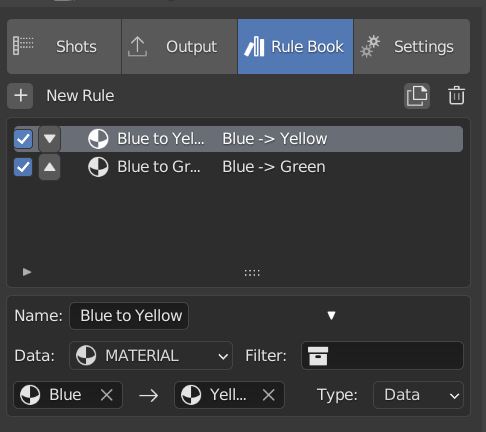
These rules follow the principle of override data A with data B. Therefore, you are provided with two data slots, left (a) and right (b). A is considered the original data and will serve as the default fallback. When assigned to a shot, all objects containing data A will be overriden to contain data B.
- Filter, use the collections filter to limit overrides to objects within the filter collection.
- Type, Material overrides have two source types. ‘Data’ refers to materials stored in the objects mesh data block. ‘Object’ refers to the containing object data. See Blender’s documentation for material link. https://docs.blender.org/manual/en/latest/render/materials/assignment.html#material-slots
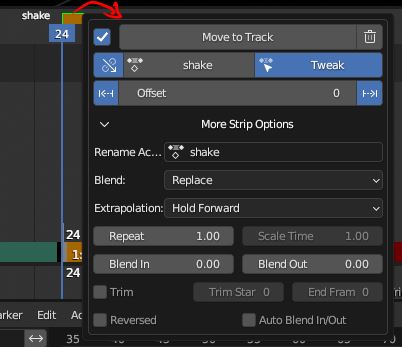
NLA Rules
NLA rules override animation tracks, strips and actions per shot, therefore, enabling the possibility of re-timing shots more easily without using the NLA editor. It is recommended to animate in the dopesheet editor or action editor as the correct animation timing is displayed. Note; multiple strips per track is not supported and can cause timeline errors, only the first strip will be considered.
In the Rule Book
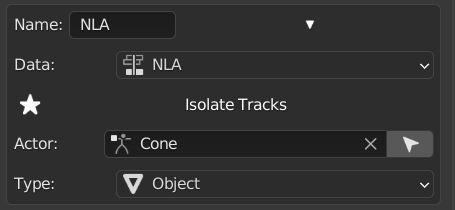
- Isolate Tracks , Automatically mute all tracks except for those used overriden by Rules.
- Actor , The Actor will be any animated object to derive NLA data from.
- Type , The Data type to derive animation data ( Object / ShapeKeys )/
In Shot Rules
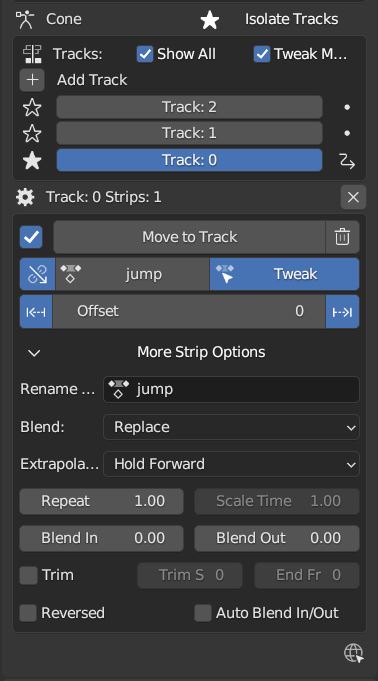
NLA rules are more specifically defined in the shot’s rule tab are also the only type that supports multiple assignments on a single shot.
Action = The holding data block for any animation.
- Show All Tracks ,List all of the actor’s NLA tracks that haven’t been overriden by this rule
- Tweak Default , Automatically set the tracks strip to tweak mode for editing in the action editor.
- Add Track , This will add a new empty animaiton track.
- Track , Select an NLA track. Note, only one Action (first strip) is used per track. Multiple Actions should be stacked on seperate tracks rather than inline as strips. Re-using tracks per shot is OK, however there is an increased risk on larger projects as it depends on the Add-on being installed.
- Delete Track , will remove a track from the objects animation data and along with any strips it contains.
- Override Track , Create a new Shot Rule for this track.
- Enable , Enable or ignore this Rule.
- Track Index , move this Rule to another track.
- Delete Rule, delete an instance of the Rule.
- Tweak , Enter Tweak Mode allowing edits to the associated action.
- Override Action , Actively override the action, otherwise use existing.
- Replace Action , The Action to be associated.
- Link Timing(left Arrow) , If enabled the animation is offset with the shots start time.
- Offset , add additional timing offset.
- Fit End (right arrow) , stretch the strip to the shot’s end time. Does not affect Action speed.
- Blend , Override the blending property.
- Extrapolation , Override the extrapolation property.
- Repeat , Override repeat function.
- Scale Time , Override scale function. Not compatible with Fit End.
- Blender In, Override blend in (seconds).
- Blender Out, Override blend out (seconds).
- Trim, Trim start and end of strip. This sets built-in ‘Manual Frame Range’.
- Reversed, Override reversed setting.
- Auto Blend In/Out, Override auto blend In/Out. Not compatible with manual blending.
RNA Rules
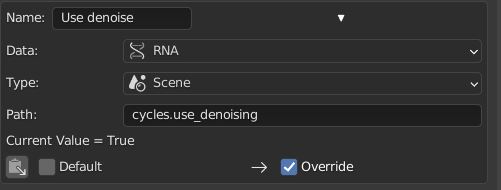
RNA is Blender’s python API accessible properties. RNA Rules are able to override just about any data type in Blender. For example, scene render settings, object visibility and even custom properties. They are useful in extending the Shot data beyond the basic options. First choose the source type of the property you would like to override. If it is a scene or render setting choose ‘SCENE’. For all other types, you will then need to choose the source data. Next specify the data path. The simplest way to find a data path is to right click a property in the interface and select ‘Copy Data Path, then paste it into the Path text box. The path should be relative to the sources data type. One notable exception is the scene’s frame rate which will not display it’s path, for this, use Type: Scene Path: render.fps .
- Type , The data type of the property you would like to override.
- Source , Point to the specific data object which contains the property to override.
- Path , The properties data path relative to the source. Custom properties should use double quotations ie, [“Prop”]
- Value to Default , Copy the current value to the default value.
- Default , The default value to revert to when the rule is disabled or not assigned to the active Shot.
- Override , The value to set this property to when enabled and assigned.
Python Rules

Python Rules contain python code to be executed every time an assigned Shot is activated. There is no need to import bpy. Names, ‘context’ and ‘scene’ are already provided. Please beware that very long code may slow down shot changes. Deep code might make Blender unstable. Python Rules are called after the majority of updates when activating a Shot. Keys should use single quotation ie. [‘prop’]
- Expression , A single line of code.
- Text File , Read python code from a text block.
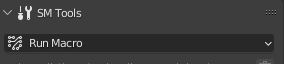
Macros
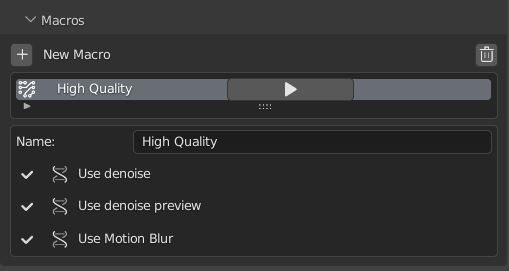
Macros in Shot Manager are a list of RNA Rules to be executed manually on click. These are useful when working with multiple settings without needing to assign RNA Rules to Shots. For example, working with various file formats or framerates but using the same Shots. Macros require the setting ‘Use RNA Default’ to be disabled and will override this setting automatically. This will ensure the changes are actually affective.
All RNA Rules in the Rule Book will appear under the Macro. Enabled Rules will active the rules ‘Override’ value, disabled Rules will use the Rule’s ‘Default’ value.
Macro’s can also be executed from the SM Tools panel.
Output
Shots can be rendered using the regular Render Animation or still operators (Ctrl+F12/F12). However only the active shot will be rendered. Batch render or output files per shot, use one of the listed batch rendering options.
Output Settings

- Root Folder will be the starting directory for shots.
- Separator , a custom separator to add between filenames and frame suffix, default is ‘_’.
- Path Type , Absolute or relative output path creation.
- Temp Path , The directory that will store temporary job files for the integrations/ submitters. Click trash can to clear files recognised by Shot Manager.
- Make Subfolders, When enabled, add a unique subfolder to the output path with the shot’s name, separating it from other shots. Disabling this will lead to shots being rendered to the same folder which potentially could cause accidental overwrites when using generated output nodes.
- Shot Subfolders , Create subfolders for each each Shot’s output. Helps to avoid clutter and potential overwriting.
- Use Suffix ,Add the shot’s suffix to the shot’s filepath.
- Always Make Reports , Generate CSV render reports at the start of every render.
- Use Default Report Path , Use the default path (output directory) or define a custom report path.
- Render As Copy , Save a Blend file when using SM render specifically for rendering. Large files make take more time however it will prevent inconsistencies if the file is changed.
- Safe Mode , When batch rendering, Blender will be run using factory start-up settings, disabling 3rd party add-ons that might interfere with the render process. Render devices are then forced and add-ons in the exceptions white list will be enabled.
- Add Exception , Allow specific 3rd party add-ons to be enabled during batch render.
Render Queue
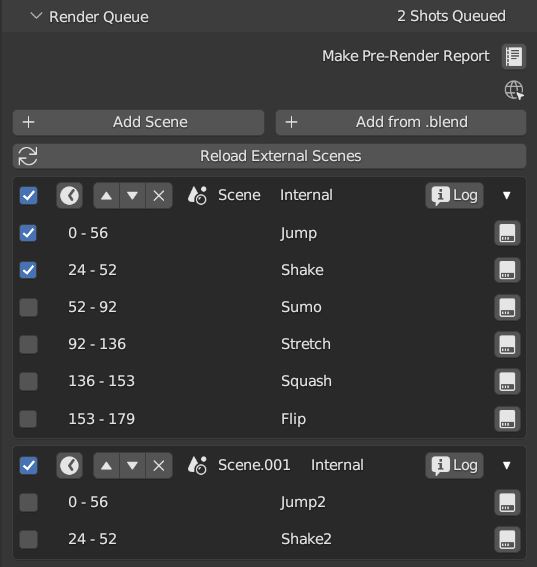
- Make Pre-render Report ,Render the first frame of each shot and generate a report CSV containing true render/shot settings from the render process.
- Add Scene/Add Blend Either add scene’s and their associated shotlists from the open project or another external Blend file via json. Local shots will be automatically linked so any changes will be reflected in the queue.
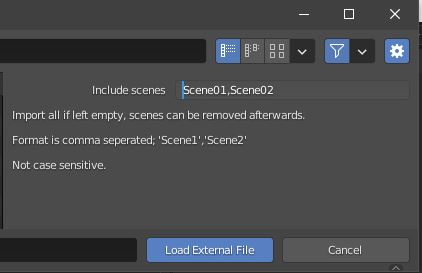
External Scenes can be filtered by listing names to include.
- Reload External Scenes External shots must be reloaded to reflect any updates to the shot list and frame ranges. Only already loaded scenes will be included and any shot list overrides will be reset.
OpenGL Render (Playblast)
OpenGL viewport rendering also uses the Export module. Only the local scene’s Shots can be batch rendered and this is not a background process.
SM Batch Render
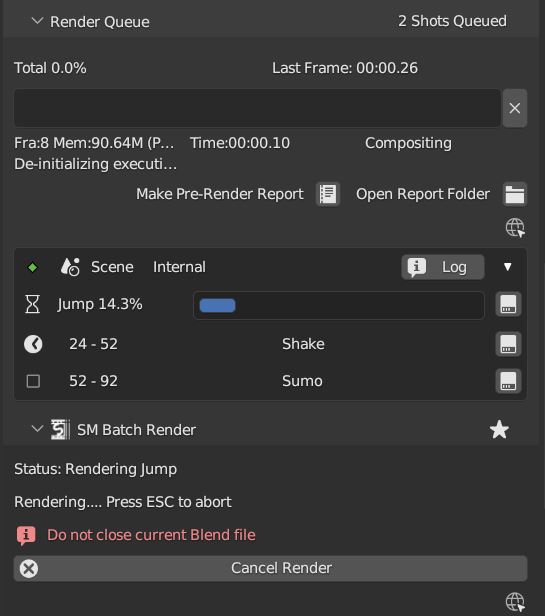
SM Render is Shot Manager’s local batch rendering module. It will perform a background render thread for each shot sequentially in the render queue. For single machine rendering. It is possible to render Shots from other scenes, as well as other Blend files. Render progress will be displayed in the render queue as well as 3d view overlay. TIP: If RAM is an issue, make an empty Scene as the master scene for queueing and rendering.
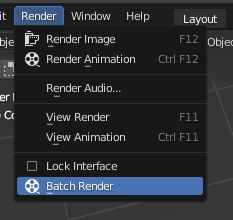
To batch render, Shot Manager will attempt to assign the hotkey Ctrl+Shift+F12, however sometimes this may need to be manually assigned. A batch render button can also be found in the Render menu.
Deadline Integration (Windows)
Thinkbox Deadline is a distributed rendering and management software. Shot Manager provides a custom plug-in for Deadline 10.0+ and submitter within Blender.
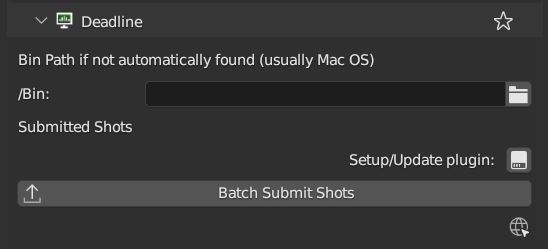
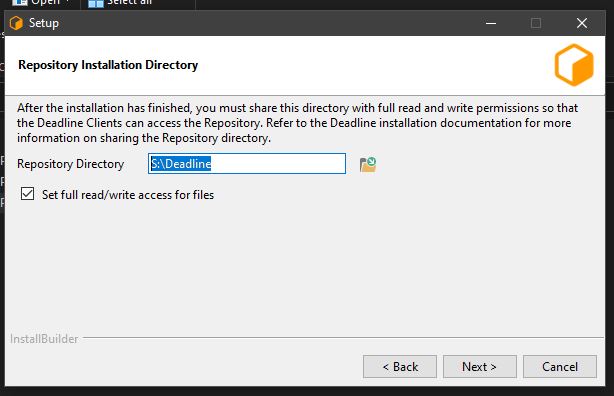
The Deadline Repository must be installed on a shared location. The Deadline render Client must be installed on all machines. Simply click Install Integration in the Deadline sub-panel to install the plug-in. This will transfer required files to the repository>custom>plugins folder.
Each render node should have the most recent version of Shot Manager installed.
Submitting a Shot All enabled shots for enabled scenes in the render list will be submitted. Ensure that the Temp Path is not empty and set to the desired location. This does not need to be a shared directory.
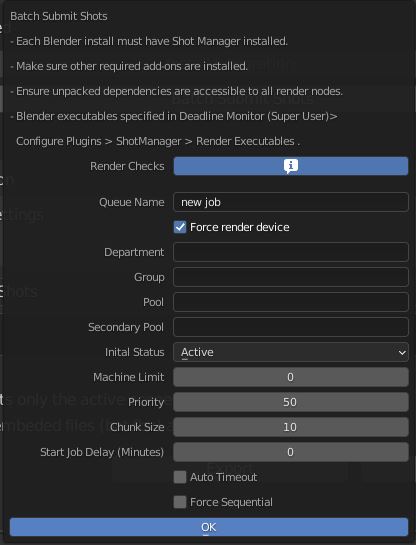
- Queue Name The folder name for containing job files, using unique names avoids overwriting older submissions.
- Force Render Device , Force the current file’s render device ie,CUDA Optix, CPU.
- Department Extra info visible in Monitor.
- Pool , Assign jobs to pools defined by Monitor’s Pool Management.
- Secondary Pool , Specifies the seconday pool that the job can spread to if machines are available.
- Initial Status Determines the initial status for jobs. Active will start rendering immediately.
- Machine Limit Limit the number of machines dedicated to the submitted jobs.
- Priotity Determines the order in which renders will execute. Lower values indicate higher priority in the job list.
- Chunk Size The number of frames to render per task. Less means more sharing across render nodes. Use higher values for simulations and larger files with long build times
- Start Job Delay Specifies the time, in minutes, a Slave has to start a render job before it times out.
- Auto Time-Out Automatically figure out if it has been rendering too long based on some Repository Configuration settings and the render times of previously completed tasks.
- Force Sequential Forces a slave to render the tasks of a job in order. If an earlier task is ever requeued, the slave won’t go back to that task until it has finished the remaining tasks in order.
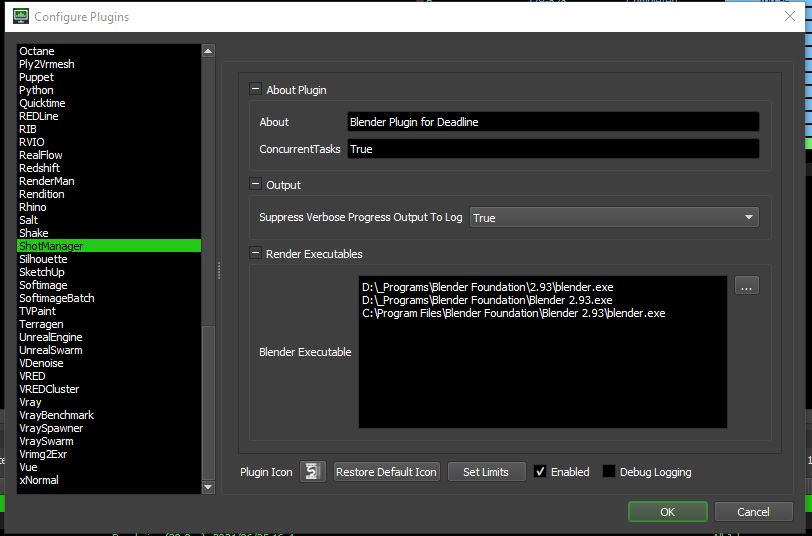
Choosing Blender Version This is configured in Deadline Monitor > Tools > Configure Plugins. You must enable Super User Modes to access these settings.
Deadline Errors
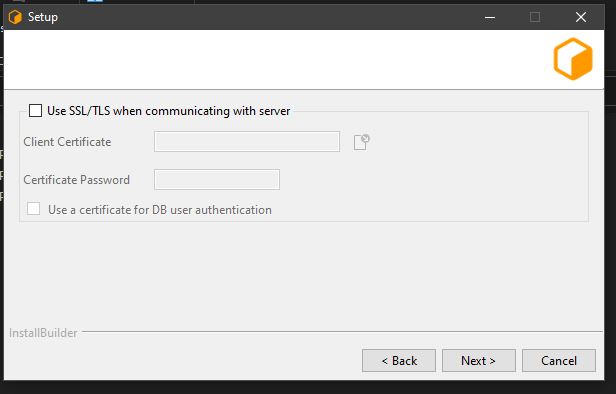
- ‘Error encountered when loading the configured Client Certificate’ This is a certificate issue with your install of Deadline, please see: https://forums.thinkboxsoftware.com/t/basic-setup-issue/24229/9 When installing the Deadline repository it is simplest to leave ‘use SSL’ unticked, and set ‘full read/write access’ in the install wizard.
B-Renderon! Integration
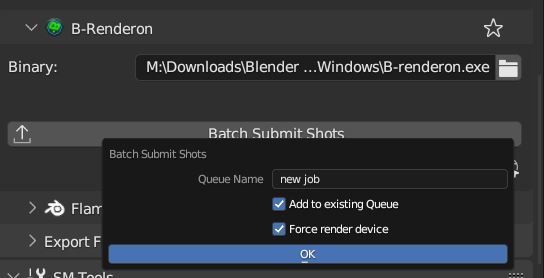
Launch B-Renderon with shots pre-loaded. Temporary job files are created in the temp folder. These files are used to access individual shots from the project render file. The render file is created in the same directory as the source .blend file with the suffix ‘_renderfile’. Requires B-renderon v3 or above. The executable path for B-renderon must first be entered in Blender Preferences -> add-ons -> Shot Manager settings
Queue Name , Open B-Renderon with shots associated with a given queue. Add to existing queue , Append the shots to the given queue if mathing name, otherwise clear all shots and overwrite the queue. Force Cycles Device ,to ensure the correct CPU/GPU configuration is applied to renders, assuming the submission machine is or is identical to the render machine.
Export Files
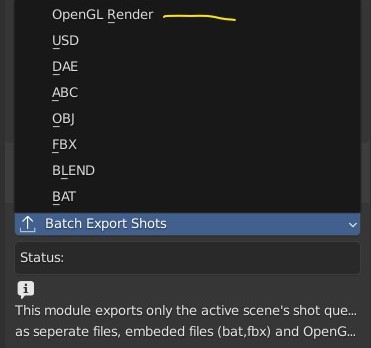
Export shots enabled in the shot list sequentially as a given format.
Export formats currently include OpenGL, fbx, obj, abc(Alembic), usd(Universal Scene Description), dae(Collada), .blend as well as .bat(Windows) files for command line rendering, either as separate files or single batch file. Batch export only uses the active scene’s queued shots and does not support shots from external Blend files.
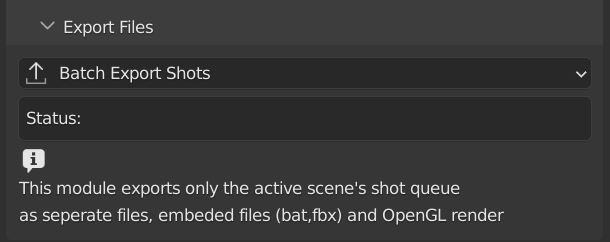
Choose output format and setting in the directory window. The settings panel appears on the left in Blender 2.80.
- FBX
The FBX Exporter is a modified exporter capable of embedding shots. This is suitable for linear timelines as traditionaly used by game animators and later split into sections in a game engine.
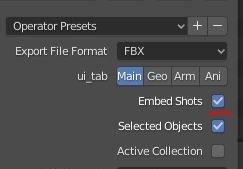
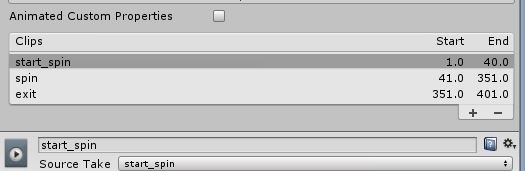
Embedded shots can store frame ranges and shot names as animation layers and extracted in other software,i.e. Unity.
- BAT
.bat files are used by Windows to execute command-line rendering. Either export separate files, per shot or, a single batch file containing an execution list. Simply open the file to begin the render process. Be sure not to move the source .blend files as references to those files will be lost.
Settings
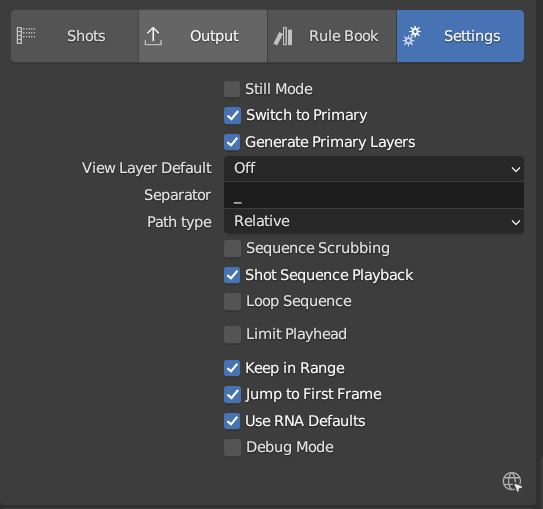
- Still Mode , Use a single frame for shot timing.
- Switch to Primary, make primary layer the active view layer when choosing shots.
- Generate Primary Layers, a new View Layer will be created with the name of the newly made shot and associated as a Primary Layer
- Keep in Range, view timeline to playhead when choosing shots.
- Jump to First Frame, place playhead at start of frame range when choosing shots.
- View Layer Default, (On, Off, Primary Layer and None). The default state of View Layers if they have no saved state for the active shot. ‘On’ will make all unsaved layers renderable by default with each shot change/trigger. ‘Off’ will default to unrenderable, choose ‘Off’ to prevent unsaved view layers from rendering. ‘Primary Layer’ will also switch all unsaved layers to un-renderable, except for the Shot’s Primary Layer. ‘None’ leaves the current state, no influence from the add-on.
- Separator , a custom separator to add between filenames and frame suffix, default is ‘_’
- Path Type , Absolute or relative output path creation.
- Limit Playhead , Don’t allow frame to be selected with mouse outside of frame range
- Shot Sequence Playback , Switch shots in sequence while playing animation.
- Loop Sequence , After playing through each shot, loop back to the start.
- Sequence Scrubbing , Allow scrubbing through shots in sequence. Not compatible with ‘Limit Playhead’
- Debug Mode , For displaying extra debug messages in console
SM Tools
View Layer Settings
- Delete All Shots, delete all of the shots or queued shots in the active scene.

This interface is for overseeing the states of View Layers, in particular, their render passes and light passes. It removes the need to switch between view layers in order to edit them. These settings are built into Blender and do not show overrides and are not in anyway related to Shot Manager.
JSON Backup

It is a good idea to backup Shots from time to time, especially when updating or re-installing the addon. A JSON text file can store information about each Shot’s properties as well as general settings for the addon. However, it cannot store scene or object data, such as cameras. Instead it will store the camera’s name and try to find it when loading. Other data that are not stored are View Layer States(stored in the layers themselves), Rules and Macros.
Export JSON, Export shot data to json to backup or transfer shots.
Include Shot Manager Settings, include settings from the settings panel.
Import JSON, Import shot data from a saved json file. Missing linked frame markers will be converted to manual frame ranges.

Ignore existing, only import shots with names that don’t match your scenes’ existing shots.
Compositor Nodes
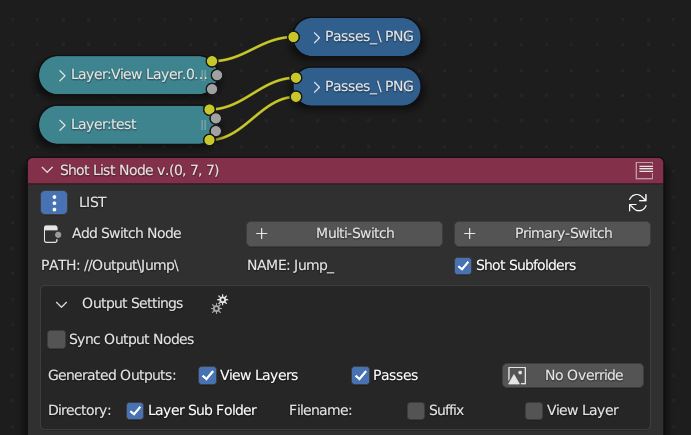
Shot List Node
NOTE : For compositor nodes to have any effect, ‘Use Nodes’ must be enabled within the compositor. Node groups containing Shot Manager nodes may not be fully supported. The Shot List node is central to Shot Manager nodes and is required for other nodes to work. A maximum of one shot list node should exist.
- Refresh, non-essential node update. Although shot Manager nodes are updated upon shot change, setting or property changes, changes outside of Shot Manager won’t be reflected immediately. For example adding new light passes to a View Layer. Shot Manager will update before any rendering.
- Multi-Switch , will create a new node group dynamically linked to active shots.
- Primary-Switch , will create a new Render Layer node which automatically switches the input View Layer to the active Shot’s Primary Layer, else mute.
- Path , The displayed path is the project’s output directory. The target folder and filenames are automatically named after the active shot. If the Constructor nodes aren’t connected to the Path Format socket, the path consists of; Root directory + shot name(folder)+ shot name + ‘_’(filename). However the scene render path in Blender’s output settings will vary when Generated Outputs are used.
- Shot Subfolders , Create containing sub folders for shot output files.
- Sync Output Nodes ,Output nodes created by the user are updated so their base path matches the output path set by the Shot List node and the active shot.
- Generated Outputs
- Layers , Automatically generate nodes to output view layers for external compositing. NOTE: nodes are generated upon any update made within the add-on, therefore generated nodes should not be directly edited. Output files will be named according to the layer name.
- Passes , Optionally separate view layer’s passes into respeitive output files. Multi-layer EXR files will alway have this enabled if using layer Outputs.
- Override File Format , This is a general override for all generated outputs. Further overrides can be added per output group. The main composite output file format is not affected. For example, setting Blender’s output file format to JPEG and then overriding it here with PNG, will make the default fileformat for generated nodes PNG whilst the the main composite node will output JPEG. Not all formats are available.
- Directory , When using Generated Outputs:
- Layer Sub Folder ,Contain layer outputs in their own folders.
- Suffix, The option to add the shot suffix to filenames.
- View Layer , Addview layer name (non-multi-layer EXR) onto the output file name.
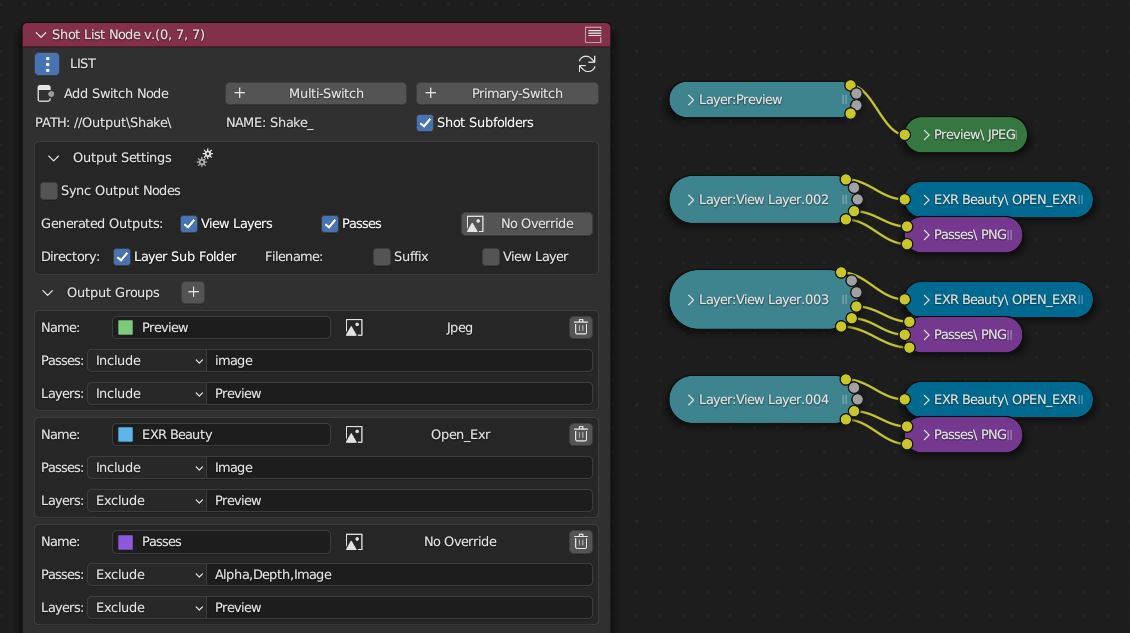
Output Groups ,When using Generated Outputs with Passes enabled, Output Groups define output file directories and are able to divide up passes into groups. Filter Render Passes using exclusion keywords separated by commas, no spaces, not case-sensitive. * * Name , Name to be used * * File Format Override , Override the default file format originally set by either the node’s general override or by Blender’s settings. Not all formats are available. * * Passes Exclude/Include , Filter passes from being output, not case sensitive. Pass names should be separated by commas. * * Layers Exclude/Include , Filter View Layers from being output, not case sensitive. Layer names should be separated by commas.

Path Format Socket , String input socket for path ‘Constructor’ nodes.
Filename Format Socket , String input socket for path ‘Constructor’ nodes.
Path Constructor Node
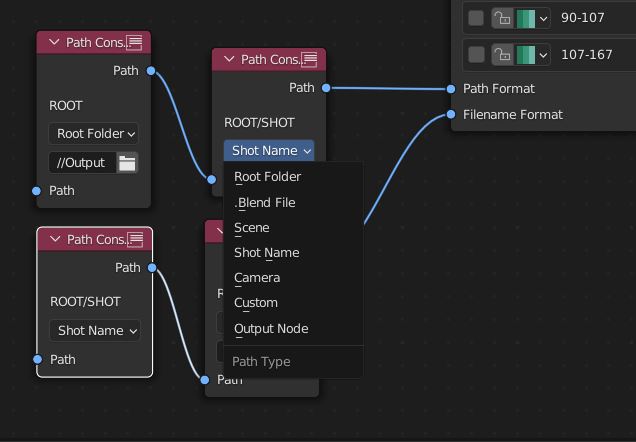
Use Path Constructor Nodes to create your own render path format, followed by the shot name. Connect to the Shot List Node’s ‘Path Format’ or ‘Filename Format’ socket. Options;
- Root Folder, the same folder set in the main panel. Must only be used as the first linked node.
- .Blend File, add the Blender filename to the path. Useful for iterations.
- Scene, current scene name.
- Shot Name, use the shot’s name.
- Camera, render camera name.
- Custom, enter a custom name. (Best practice is to avoid spaces, use _ instead)
- Output Node, uses the custom name of the output node, useful for exporting EXRs without overriding the default output/composite (which will use the custom ‘main output text’), or to avoid duplicate filenames when using multiple output nodes.
Collections Inspector Node
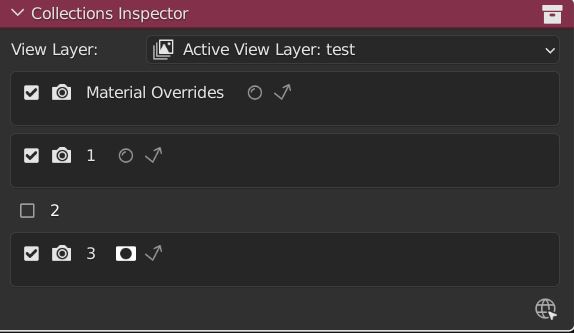
An alternative interface for overseeing and modifying collection states per View Layer. This aims to bring back the kind of oversight possible in Blender 2.7 where layer visibility, holdout and indirect states were laid out in view layer settings. It can also be used to keep track of very complex scenes with many nested collections. Setting the View Layer to ‘Active View’ will use the currently active view layer. Changing the view layer in the drop down menu will not change your currently active view layer. This can be quicker in large scenes to avoid loading objects.
Output Viewer Node
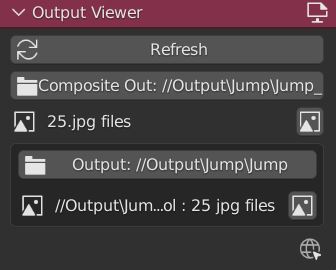
Used to count matching output files in all output paths. If a folder or file is detected you may click the folder icon to open the directory in your OS explorer or click the image icon to load it in a Blender Player. Files are counted when the refresh button is clicked. Only file containing the output filenames and extension are counted, therefore there may be other files in the directories that are not counted.
- Refresh , Update the Output Viewer list.
- Open Directory , The folder exists and can be opened in an OS file explorer.
- View Output , The images contained in the directory will be displayer and played using the scene’s frame rate. Use numpad buttons 0-9 to control frame rate, 9 is slowest. Arrow keys left and right will pause and increment current frame. Press Enter to play animation. Esc key to close window.
Multi-Switch
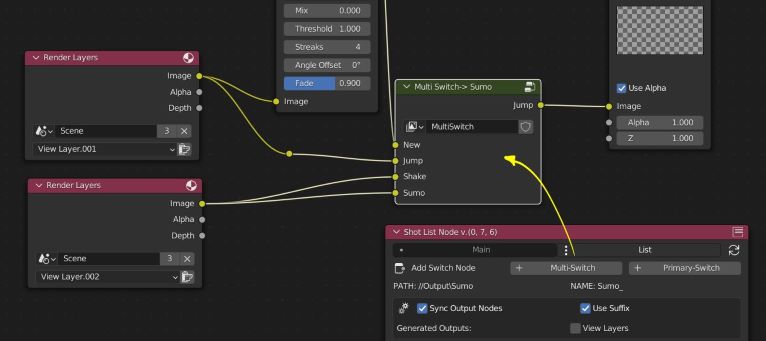
The Multi-Switch is a handy node group that generates inputs per shot. The active input is connected internally depending on the active shot. This allows the user to have multiple node graphs pointing to the Composite Node and only render the relevant one to the active shot. Do not modify this node’s name, group name or internal nodes. Requires a Shot List Node.
Primary-Switch

The Primary Switch is can be used in combination with Primary Layers. If a Shot has a Primary Layer (read more in View Layers->Primary layers), the input render layer will be set automatically to the Shot’s Primary Layer. This approach is intented for simple nodegraphs where the Primary Layer is to be the main output. Note, this wil not garuntee that the Primary Layer will be enabled for render. For that, use Primary Enabled option in Unpinned Defaults or ensure the layer is pinned in the Shot’s View Layer settings.
Known Issues
Missing Overlay Edit Tool Icon , This seems to be a permission issue more likely when using a shared directory. A fallback icon will be used instead.
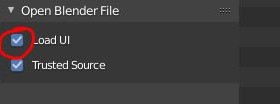
Missing file explorer options . This can occur when going between versions of Blender. SOLUTION- Restart Blender , disable ‘Load UI’ first when opening.